DISCLAIMER BEFORE WE GET STARTED
I did not come up with this idea or the 3D prints or initial design. According to the Print Kits page, the models were made by Caleb Kraft (who is the wonderful human running The Controller Project), but posted by Cocoa Press on their Printables profile. Then the assembly video and guide were posted by Print Kits. Links to the source models, guides, and videos will be posted below, along with their licenses (if applicable).
While my contributions may be licensed under Public Domain, the models and guides I used are not. Please respect the respective licenses of the original creators.
What I’m bringing to the pile is: Simplified keyboard code (licensed under Public Domain) and a sleuthed-out bill-of-materials, including spring sizes and button dimensions.
Where to get it
What I used, but did not make:
- Giant Mechanical Keyboard Switch Printable Parts | Printables | Cocoa
Press
- Licensed under CC-BY-NC-4.0
- Print Kits - Project: Giant Mechanical Keyboard Button - Parts List and Link to YouTube Video
- YouTube - Print Kits - Big Button Instructions
What I made/documented:
Simplified Circuit Python Code
The original Printables page has a zip file of code, but it seemed overly-complicated for my use-case (just press spacebar), so I wrote my own Circuit Python script:
Raspberry Pi Pico Spacebar - Licensed under Public Domain
Dependencies are on the Readme on that page.
Improved Bill-of-Materials and Dimensions
The original pages don’t include any specific sizing information for the springs or button, so I did some semi-educated guessing and found the answers:
Springs
- Quantity: 2-4x
- Use more springs to increase resistance. 4 felt right to me.
- Outer Diameter: 13mm
- Length: 45mm
- Wire Size: 0.8mm
- DO NOT BUY 1.6mm WIRE!! If you do, you will need the strength of the GODS to depress the BEEG BUTTON.
What I bought: Amazon - Compression Spring 13mm OD, 0.8mm Wire Size, 45mm Free Length
Arcade Button
- Quantity: 1x
- Total Size: 33x26mm
- Note: Be sure to get one of the “shorter” buttons. A button that is too tall can make the wire routing annoying.
- Note: These are often listed as “30mm Arcade Button”
What I bought: Amazon - 30mm Game Push Button Switch
Multicolor Dupont Wires
- Quantity: At least 2x (depends on your soldering ability, mine is bad)
- Note: These are just generic wires. You don’t necessarily need dupont connectors, but they allow just plugging in one side into the Pi’s pre-soldered connectors, so that saves a step.
- You can buy these just about anywhere. Amazon, AliExpress, doesn’t matter.
I had these laying around from an old project, but you can find a similar kit here on Amazon.
If you need a soldering iron: PINECIL
This little thing has been fantastic. I’m just a beginner here, but I’ve been happy with it so far.
You can buy one from Pine64 right here.
What I Failed At - DO NOT BUY THIS ONE
Raspberry Pi Pico
- Quantity: 1x
- DO NOT BUY THIS ONE
- Seriously, it functions, but I had to hot-glue this into the bottom of the key case because it doesn’t fit the mounting profile.
- I have no idea where the super-tiny Raspberry Pi comes from in the Print Kits video. I tried to find it, but haven’t been successful. If you know, please reach out on BlueSky.
What I bought (THAT YOU SHOULD NOT BUY UNLESS YOU ALSO WANT TO HOT GLUE THIS COMPONENT INTO THE KEY CASE BOTTOM - YOU HAVE BEEN WARNED): Amazon - Pre-Soldered Raspberry Pi Pico
Neat Trick
So, how did I figure out what springs I needed? Did I have to just buy a large
pile of variously-sized springs and try them one at a time? Thankfully, not. I
was able to get the size pretty-damn-close by using the Cut and Add Shape
tools in PrusaSlicer. Let me show you:
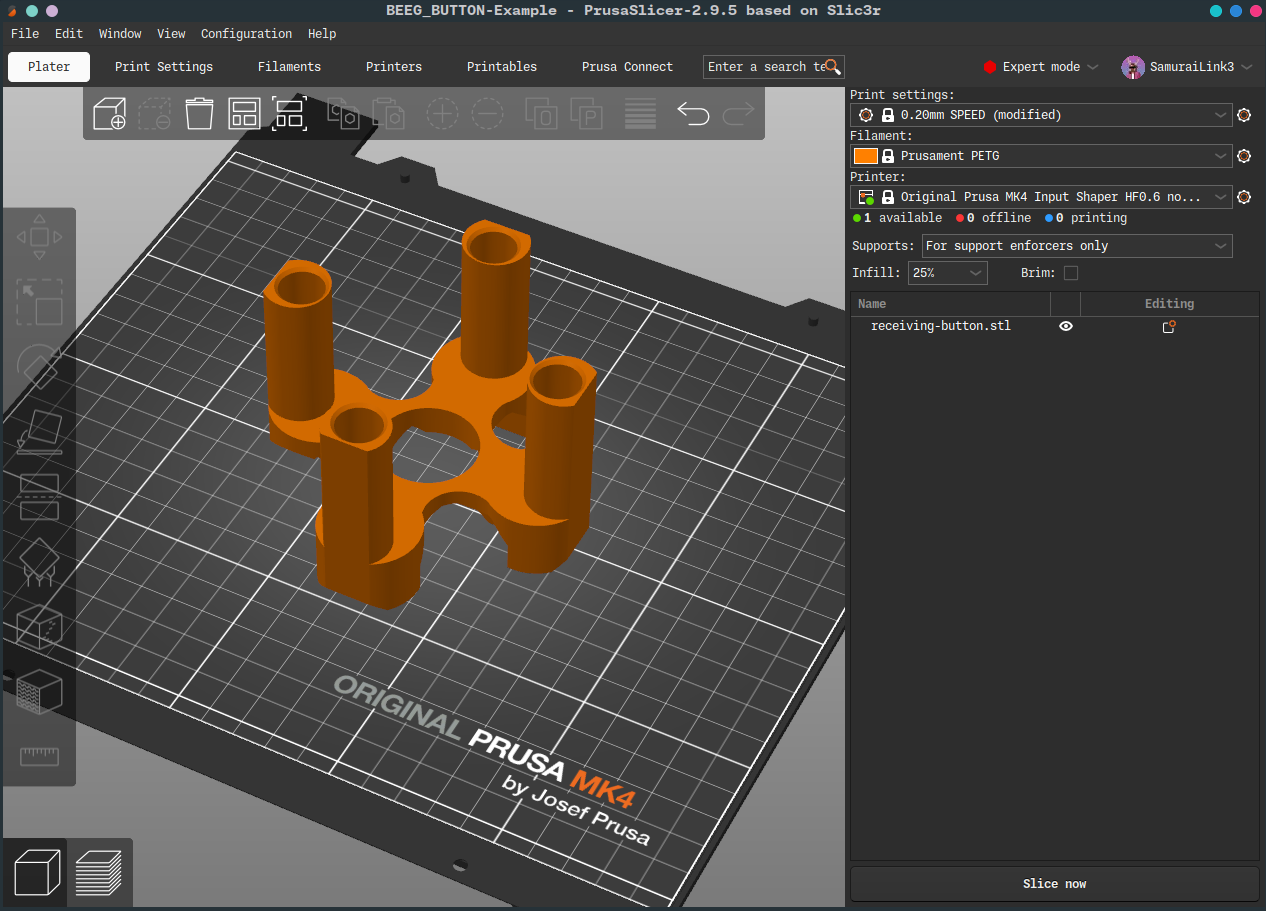

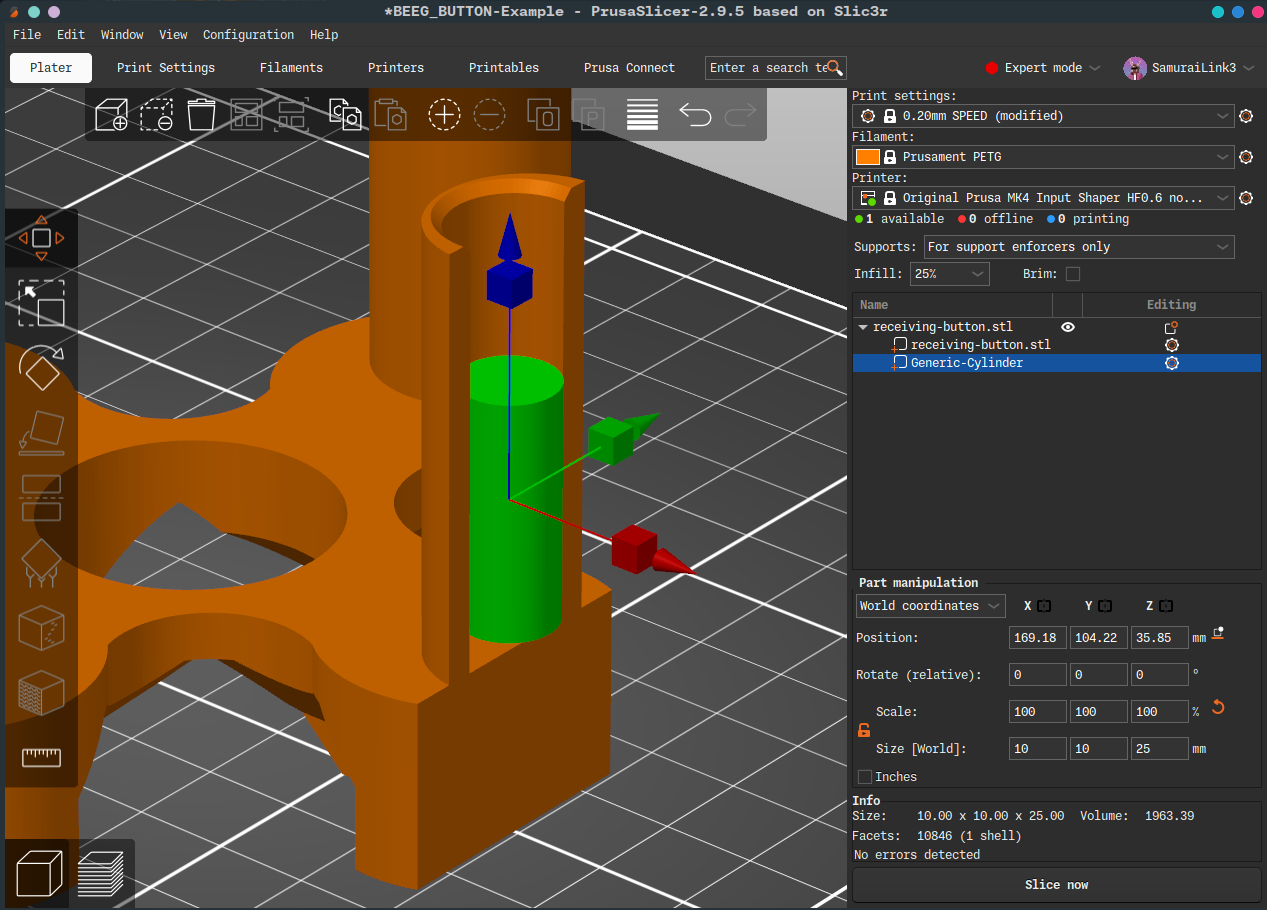
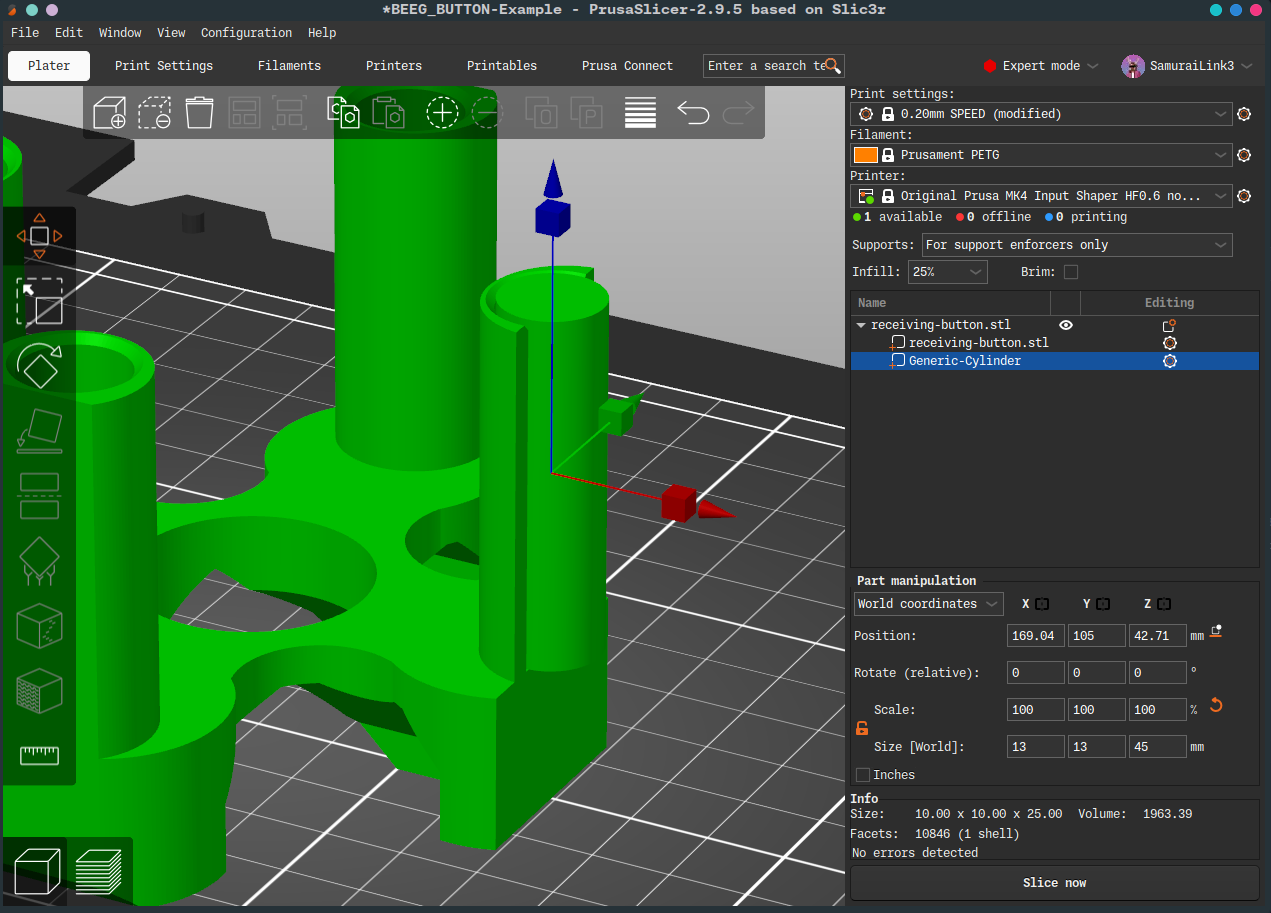
The size of that cylinder gives us a target size for our spring. STEP files and CAD software is another way we could solve this mystery, but the slicer is pretty powerful in odd ways when you need it to be.
How it works
As the big key is depressed, a stem travels downwards to push a mounted arcade
button. That button is connected to a Raspberry Pi Pico via the GP7 pin. The Pi
is programmed to emulate an HID Keyboard. The script sends the SPACEBAR
keycode when GP7 pin is triggered. The big button is just a weirdly-shaped
spacebar.
Background (aka story time)
So, what is this all for? Rhythm Doctor! Which is one of the best rhythm games I have ever played. It wants you to smash your keyboard to the beat, and it feels so good to do. It really gets you into the music and gets you moving, like the very best rhythm games do. The issue is I kept hitting other keys next to the spacebar, changing window-focus away from the game, and breaking my flow (I get really into rhythm games). Also, I’m sure it wasn’t great for the keyboard either.
So: BEEG BUTTON - If I could wail on that instead, it would be:
- Cool as hell.
- Functional.
Those are the two best reasons to do anything. So I put one together. And how did it end up working? Well… Its not exactly eSports-rated.
The accuract really depends on the angle in which you hit the button. Wailing on it produces many misses and late beats. This could be a skill issue on my part, or too long of an actuation-distance, but it means you do have to slow down and try to be accurate. I’m sure these issues could be solved with some slight modifications to the design.
The sound of PETG-on-PETG contact is just not nice. I need to sand or lube-up the contact areas to cut down on this noise. With good headphones, its not a problem, but otherwise its kind of grating.
That said: Its fun as hell. Its goofy, looks cool, and is somewhat-functional. It was a worthwhile project and I’m happy just looking at the thing. It also has some great future possibilities. My Raspberry Pi Pico doesn’t have networking built-in, but other micro-controllers do. You could hook this thing up to APIs to do some absolutely wild stuff. If you were truly insane, you could even start to craft a BEEG KEYBOARD, but that would be a pretty steep expense.